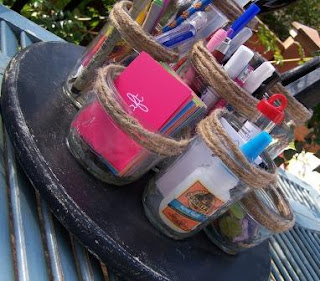
I describe myself as a organized-disorganized person. I pretty much know where everything is, even if it is not logical or evident to anyone else. I am desperately trying to change things...as the kids get older, and I get busier with my own projects as well as theirs, I need a quicker response time. So I am getting organized (or trying to)
(see my cute Moo business cards and my Gorilla Glue - always handy!)
This will be a long and ongoing series of "Project: Get Organized."
If I get brave I will show you a before photo of the garage -
that is only for the brave to view as well!
(see my cute Moo business cards and my Gorilla Glue - always handy!)
This will be a long and ongoing series of "Project: Get Organized."
If I get brave I will show you a before photo of the garage -
that is only for the brave to view as well!
Back in design school I had one of the pretty plastic desk caddy's. It was all about function! Well, I have not had one in a while, but I came to the conclusion I needed one, but one that fit my style a little better.
I made this organizer and it sits right by my computer and it has made my life easier in the few short days it has been there (now I wish I would have done this a long time ago...I had the idea in October, but just got around to it! Seriously I need an assistant or ten!)
Supplies
- Rockler: 12" Lazy Susan
- Rockler: Milk Paint, Lamp Black
- Purdy Paint Brush
- Rockler: Sanding Bug
- Rockler: Deft Wood Finish Spray
- Gorilla Glue Epoxy
- 14" wooden topper/disc from the hardware store (about 1/2" thick...like the kind that can be used for tabletops)
- 4 small screws - the length depends on the thickness of the wooden topper. I used ones I already had, only about 1/2" long.
- Jars: I used a variety of canning jars left over from cake in a jar season : 1-quart, 2-wide mouth half-pint, 1-wide mouth pint, 2-pint, and 1 larger jar I bought at Goodwill. (you can also use cleaned food jars too)
Optional:
Twine/jute or ribbon or fabric trim
Hot glue
Tools:
Drill and bits or screwdriver and small screws
Hot glue gun (optional)
DIY IT!
Here is a PDF of the Desk Caddy tutorial
OR
Go check out The DIY Club for the full tutorial!
It is simple: paint it; attach it; epoxy it; fill it up!
This has totally cleaned up my downstairs workstation and I LOVE it!
And it was beyond easy to make!
How do you stay organized?????
How do you stay organized?????
Fill it up with your good stuff. You may notice some of my tools are beat up...well, they have history...the ruler and scissors have been a round since design school.
Disclosure: I received some products for free through my affiliation with The DIY Club. Please visit the Business/FAQ section for more on my disclosure policy.


this is adorable. I totally get the organized disorganized person thing and that's a perfect term to describe me as well. good for u for reusing ur cake in a jar jars!
ReplyDeleteI seriously LOVE this idea!!! and thanks for the link to "moo" business cards.... I'm in desperate need of some, just can't decide who i should go through!
ReplyDeleteLove it! I also love moo cards!
ReplyDeleteVery nice! I'm an organized-disorganized type, too. I tend to let me messes go and go (so long as I can still find things) then do a massive clean up when I can't stand it anymore.
ReplyDeleteI too am organized-disorganized. I know where everything is, even if it is NOT in it's place! :)
ReplyDeletemaybe you'll rub off on me!? (I can only hope!)
great job holly!
gail
(circle of bliss rocks)
Love them! Such a good idea! I usually just use the jar blank... but this is better!
ReplyDeleteI love organizing posts! This one would be great around here, too. It would also work for my teaching/school supplies.
ReplyDeleteGreat DIY post! Much easier to do this than to walk around office supply stores trying to figure what would accommodate all my different things.
ReplyDeletelove this!! so clever & looks darling!
ReplyDeleteholy crap you are a genius! A lazy susan! VERY smart!! I will be grabbing up one of these!!
ReplyDeleteI love this perfectly simple solution! It's gorgeous, can be prettied up in whatever way fits your decor and is super functional! Thank you for sharing!
ReplyDeleteThis might be a great option for organizing my kids art supplies!
Hi Holly,
ReplyDeleteJust hopped over from Strictly Homemade's linky party, and found your very creative and beautiful blog. I really like this jar organization idea; I recently altered a few tin cans into organization containers, but I might borrow your lazy susan idea to glue them in place. Would love you to visit. http://altered-artworks.blogspot.com/2011/04/tin-can-alley.html