My outdoor area needs some serious sprucing up. There is a lot of space but I am starting little...like with the deck area...I am so ready for some evenings sitting on the deck, listening to the waves crash, and just relaxing!
The first step is the outdoor transformation is to get out all of those clay pots that I have done nothing with for 2 years now and giving them a facelift.
I had an idea for the pots, a little something more than just painting them...and it worked! I love when my ideas work!
Supplies
Decoart Patio Paint, Sweet Pea
DecoartPatio Paint, Vintage Rose
Decoart Glazing Medium
Decoart, Snow-Tex
Cutting Edge Stencils, Fern Leaves Small
Foam Brush, Rockler
Painters Tape
Scissors (optional)
Clay Pots - medium size for these stencils
DIY IT!
It's simple to do!
1. Paint
the pot, all over in a solid color (NOTE: I did not do this - I wish I
had...I applied my Snow-Tex first...painting it all over would make it
easier to fill in those little spaces created when yo add the Snow-Tex)
2. Let dry.
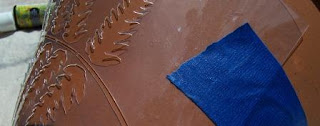
3. Position the stencil on the pot and secure with painters tape. Shh...don;t tell I cut around my stencil to make it lay flatter on the pot. If you have a larger pot, you would not need too.
2. Let dry.
3. Position the stencil on the pot and secure with painters tape. Shh...don;t tell I cut around my stencil to make it lay flatter on the pot. If you have a larger pot, you would not need too.
4. Apply
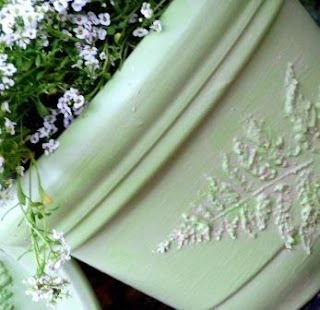
the Snow-Tex either with your fingers (like me)...or with a palette
knife or old credit card, making sure to fill in all of the spaces...It
does not have to be perfect!
5. Let dry completely!!!! Important, so that you do not smear the Snow-tex when painting.
6. Once dry, paint all over with base color, Sweet Pea. I applied 2-3 coats.
7. Once
dry, I want a slightly subdued effect, so I mixed some of the Vintage
Rose with the Glazing medium in a 1:1 ratio and applied it to the pots.
Totally optional!
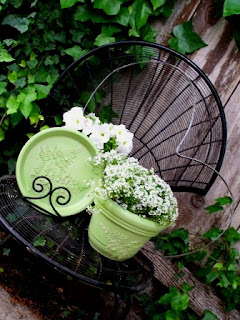
Ta-da done! And I think it looks amazing and expensive!
For
the saucer, I used the same process...when I applied the Snow-Tex, I
positioned the leaves, then removed one leaf and applied the Snow-Tex to
one leaf and let dry, then came back and did the same for the other
leaf and finished it off like the pot. Imagine how cut this is with a
DISChanger as a plaque (just saying you may see a themed set here
soon!).
What are you doing to spruce up you outdoor space?
Linking up at!
Get Your Craft On and Today's Creative Blog!


Wow, great job! They look awesome!
ReplyDeleteThose are so pretty. Your creativity is unmatched Holly!
ReplyDeleteWOW! That texture is awesome!!!! This is a great idea and really spruces us a plain pot. :)
ReplyDeleteThis is a wicked cool project. You could use that technique in many other ways, too! Really neat!
ReplyDeleteAwesome idea Holly! Troy and I have are own herb business and this year we have volunteered at a local highschool to work with some of the kids in the argriculture program. They have been collecting used planters and I have been working with them to create pretty outdoor herb planters. We have been doing a bunch of chalkboard ones. I was looking for another idea to spruce these old pots up. I will give this a try! Thanks.
ReplyDeleteThat is very cool!
ReplyDeleteI love stuff like that!
If you get a chance, I would love for you to check out The Blogging Buddies Social Network
...you can create a profile, and add your blog, Twitter and Facebook links in the appropriate groups. There's even an arts & crafts group!
Why not join in the blog-hopping fun?
Have a great day!
Carolee
Come on home - mom blog
Working at home advice
This is really creative Holly!!! I love the texture of the leaves - wow.
ReplyDeleteYou're amazing. ;)
That's really nifty!
ReplyDeleteThat's such a great look! I can think of so many uses for it!
ReplyDeleteIt reminds me of a similar technique using stencils and drywall compound. Yours has a softer look which I really like.
Wow!! That is a fantastic idea! I am going to do thid today. Thanks.
ReplyDeleteI love this, Holly! I have so many boring pots on my patio. This technique would really dress them up! And I'm so jealous you can hear the waves from your deck. ;)
ReplyDeleteThis is just sooooo gorgeous!!!
ReplyDeleteLooks great, thanks for sharing.
ReplyDeleteVery creative Holly.
ReplyDeleteWe are redoing our patio and the Mrs. will be looking for neat ideas like this to offer a finished look.
What a great idea. Really gave that pot a whole new look. I like the idea of hanging some of the pieces on the fence!
ReplyDeleteGosh Holly those are fabulous and so pretty, I've seen that paste stuff before but wasn't sure what would be a cool project for it. What a great way to get a customized look for so much less than what really cute pots, like yours, cost at the store!
ReplyDeleteThis is really pretty! Thanks for sharing. I'm visiting from Creative Collage!
ReplyDeleteThat is really pretty! Ugh...I need to spruce up our deck soooo badly, and my inlaws are coming tomorrow...I have a lot to do ;)
ReplyDeleteOk that is genious! They look so enpensive too. While I was looking at the pictures and saw you added texture to the water holder I was thinking "now why would she put all that wok into something you can't see??" Well, that is the difference between a real designer and people like me....your display is awesome and makes it not just functional but a piece of art. Beautiful!
ReplyDeleteThanks for linking up to Strictly Homemade Tuesday!!!
Gorgeous....I am going to try this one!
ReplyDeleteLove it!! What a great new way to use snowtex.
ReplyDeleteRuth
That is so cool! And thanks so much for linking up with my little party... I appreciate it! :) Can't wait to see what's next.
ReplyDeleteWow Holly! How do you think of these ideas?? You're a genius. :) These are just beautiful.
ReplyDeleteVery cool idea! Love it!
ReplyDeleteJen
So clever! I need to try this!
ReplyDeleteThis is so clever, and seriously gorgeous!
ReplyDeleteHolly, that is such a fabulous and original way to use SnowTex! I love the fern stencil, and your pots turned out as professional as any pot you'd pay a fortune for at Smith & Hawken.
ReplyDeleteJenn