My little doll had a birthday party recently (OK, 2 birthday parties) and it was inspired by the Lalaloopsy Dolls. If you are not familiar, Lalaloopsy Dolls are fun, funky, and whimsical dolls (although I wish they were not so plastic - their heads are huge and could be a weapon). I love the crazy colors of their outfits and the two dolls my daughter has just really inspired me to go forth with this theme (I talked her out of a Tangled theme. I do love that movie though).
When I do a party or event I like the details to be more subtle, with maybe one or two literal translations, that is why I always say "inspired-by."
I used the colors and fun spirit of the dolls to create the party.
Now, Jules LOVES rod pretzels,
and I have made pretzel wands for years,
but I wanted something different...
then I remembered Jenn had purchased the Fry Box Die
from Lifestyle Crafts (and I have the Epic 6),
and so it was a match made in heaven -
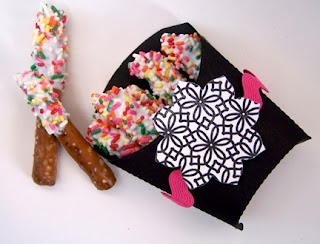
PRETZEL FRIES!
This is so fun...and better yet...super easy!
SUPPLIES
(Disclaimer - I am not technical or fancy...I like to work with what I have, so this is what I did and used).
- Pretzel Rods or Thick Pretzel Sticks (I had purchased the long rods already, so I used those and broke them in pieces)
- Melting chocolate - your choice of color. I used white (available at craft and most party supply stores)
- Sprinkles
TOOLS
- Glass measuring cup
- Microwave
- Spoon
- Wax Paper
- Aluminum foil
- Cookie sheet
OPTIONAL - for presentation
- Epic 6 Letterpress
- Fry Box Die
- Nesting Bloom die
- Ric-Rac or ribbon
- glue dots or double stick tape
DIY IT!
- Prepare your pretzels. There is not much prep required other than opening the bag if you buy the shorter pretzels. In my case I had to break the pretzels in two.
- Line the counter with wax paper/cutting boards/something to protect the counters. I had a piece of wax paper for dipping the pretzels; a cookie sheet lined with aluminum foil for rolling the pretzels in sprinkles; and more wax paper (laid out on the counter) for laying the pretzels on to harden/dry.
- Place melting chocolate wafers in microwave safe glass measuring cup and heat according to package directions (typically, microwave on low for 30 seconds to one minute, stir, and repeat and short time intervals, stirring until smooth and melted.).
- When melted, remove from microwave.
- Dip end of each pretzel into the chocolate (I only covered 1/2 to 2/3 of the pretzel and in the case where I broke the pretzels in half, I covered the broken end).
- Give the pretzel a slight tap on the edge of the measuring cup to shake off excess chocolate.
- Dip or roll in sprinkles.
- Place on wax paper to dry.
PRESENTATION
As mentioned I used my Epic 6 and the Fry Box Die Cut to "fancy-up" my presentation the fries. The majority of the fry boxes were not decorated at the party, just a few. (I simply ran out of time). Read more about the Lifestyle Crafts NEW Dies.
I am sure you could find paper fry bags at a restaurant supply store or a store like Smart and Final (but I LOVE my die cutter, just sayin'). Then decorate them using purchased die cuts or embellishments from the craft store.
- Cut die out of black cardstock and assemble fry box using perforations and directions.
- Cut a medium size nesting bloom out of a corresponding cardstock (I used a piece of letterpress paper I had made previously).
- Wrap ric-rac or ribbon around fry box and secure in back with glue dot or double stick tape.
- Attach bloom die cut on front of box using glue dot or tape.
- I do think I should have added a sweet button to the middle of that die (buttons were a reoccurring element in the party details too).
More party details coming soon!
Disclosure: I am in an affiliate program with Lifestyle Crafts</a>


pretzel fries?! It's the IDEAL party food! They look so fun and ready to munch on. LOVE.
ReplyDeleteThese are so cute! Fun idea!
ReplyDeleteLooks fancy to me! Great idea Holly... and there's an endless amount of possibilities with that fry box!
ReplyDeleteSo cute! And calling them pretzel fries makes them even cuter:)
ReplyDeleteDeliciousness and gorgeousness... and it looks so easy that I can do it myself. Love that!
ReplyDeleteHolly, every detail at that party was wonderful and whimsical! The pretzel fries were such a fun idea and great use of that awesome fry box!
ReplyDeleteJenn
What a super cute idea! Now you're going to have to top this awesome party next year!
ReplyDeleteHi Holly!
ReplyDeleteI'm stopping by to say Hello!
These Pretzel Fries look great.
You are so creative.
Oh my gosh, Holly! These are wonderful!!! And they look so fantastic! Excellent idea & presentation...;)
ReplyDeleteSo cute AND yummy! This looks like such a fun party, Holly!
ReplyDeleteI bet they were a HUGE hit at the party! So cute!
ReplyDeleteSo cute and so yummy!
ReplyDeletejen
I am really very glad after read here and I appreciate for the information that you presented here.
ReplyDeleteYUMMY!! On top of that the presentation is just beautiful. So neat!
ReplyDeletei really need a die cutter...but where i would put another craft object, i do not know...probably in my car, with me,when my husband kicks me out ;). the fries are inspired..just the thing for a colorful and fun birthday party.
ReplyDeleteliked it very much :). Thank you very much.
ReplyDeleteFantastic share and great blog. Thanks for this.
ReplyDeleteWhat I saw was ruffled my appetite.
ReplyDeleteUp to what exactly agree with your post.
ReplyDeleteGreat sharing, thank you very much.
ReplyDeletePhotography is an appetite.
ReplyDelete