I immediately fell in love with these little paper food trays from Lifestyle Crafts.
I had visions of tea parties with my girlies and with her American Girl Dolls.
Then I thought about how great they would be for school parties and little snacks...
and then the Valentine bug bit me again!
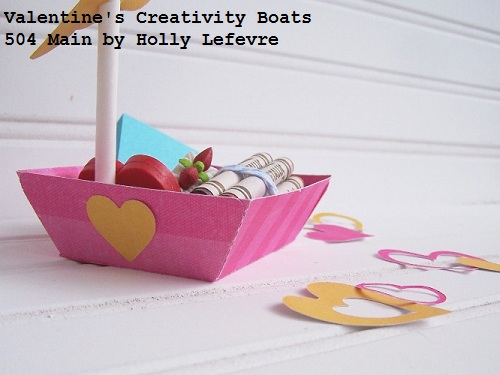
So, I made a little boat - the perfect vessel for filling with Valentines treats!
Of course candy would work well...
but I chose to go with a non-candy theme for this project.
I was inspired but what my little girlie loves - to be creative.
but I chose to go with a non-candy theme for this project.
I was inspired but what my little girlie loves - to be creative.
So, I filled the boats with crayons (tied with bakers twine),
a heart shaped crayon (because it was cute),
a little pad of Post-It notes (because sticky notes are awesome!),
and some dessert inspired erasers (sweet!)!
There are really so many ways to use the food tray -
in fact next week, you will see how I use them on our picnic!
Here's how to make these little boats.
I used my die cutter for many of the pieces of this tutorial,
but if yo do not have a die cutter, this can provide great inspiration
and you can achieve this look with other items you may already have on hand.
SUPPLIES
- Die Cutter (I use the Epic 6)
- Lifestyle Crafts Food Tray Die
- Sturdy Paper sch as cardstock or scrapbook paper. Double sided paper work well because you will see both side of the paper.
- Glue/Adhesive: I used a glue stick, hot glue, and spray adhesive. I have these things on hand...you can do this project with less variety of adhesives. I do recommend hot glue for sticking the "mast" down.
- Oh Happy Day Alphabet Die (you could use stickers or print out the words)
- Heart die
- Scallop Squares Die (or cut a square from paper)
- Paper straws (mine are from Passion Purveyors - I buy them in bulk. The website says they are $1000 but that is a typo)
- Hole punch
- Scissors
- Hot glue and hot glue gun
- Small craft spools or small Styrofoam balls cut in half (OPTIONAL
- Optional: ribbon or pom pom for top of "mast"
MAKE IT!
- Using the die cutter, cut out the food tray, letters, and hearts. I cut two food trays for each boat because I did not buy double-sided paper and I wanted the inside and outside of my boat to look the same. They I used spray adhesive to glue them together.
- Assemble the food tray: bend along dotted lines; fold sides up; fold in the tabs; and using a bit of glue finish off the tray by gluing the tabs to the inside of the boat.
MAKE THE SAIL
- Cute one scallop square for each sail in a desired color.
- Fold in half, matching the scallops.
- Cover your work area (for spray adhesive it is best to work outside) with newspaper.
- Unfold the square, and using spray adhesive spray the inside of the square and then press back together.
- Use a hole punch and punch one hold on each end of the square, near the folded edge.
- Using the adhesive of your choice (I used spray adhesive), place letters and heart/decorations on the sail.
- Insert the straw into the bottom hole (from the top) and then back through the top (from the bottom).
- To attach the mast/sail to the boat you can:
- 1 - Insert one end of the straw into the spool (I had to pinch the end of my straw to get it in) and then glue the spool to the base of the boat OR
- 2 - Put a BIG dollop of hot glue in the corner of the boat/tray (I held mine up and tilted toward that corner to pool the hot glue in that area) and place the base of the straw into the glue - you will have to hold it for a bit, until the glue hardens. OR
- 3 - Cut a small Styrofoam ball in half; insert the bottom of the straw into it, and glue the half ball int the tray.
- OPTIONAL: you can glue a pom pom or add some ribbon to the top of the straw/mast for decoration. I just stuck a few short length of ribbon into he top of the straw.
I also added a little heart n the back, just for fun.
Of course you can embellish it any way you want!
Then...fill it up with whatever you want to give your Valentine!
You can get 20% your Lifestyle Crafts purchases
by using the code
"504MAIN" at checkout!
by using the code
"504MAIN" at checkout!
This post is written and created at 504 Main by Holly Lefevre
disclosure: I am an affiliate of Lifestyle Crafts. Some dies and products have been provided to me.


So cute!!! The colors look beautiful.
ReplyDeleteHolly, these are SO cute! I like how you chose non-candy items to fill them with. :)
ReplyDeleteThose are so adorable!
ReplyDeleteDenise
Holly, these little boats are really creative. What a great job you did making them and how imaginative to think of putting in them the items you chose! You are so smart.
ReplyDeleteWhat an adorable idea, thanks for sharing it Holly! Check out more kid-friendly Valentine's Day craft ideas here: http://www.care.com/child-care-41-easy-diy-valentines-day-crafts-for-kids-p1017-q24629994.html
ReplyDeleteThese are simply adorable and so unique - I love them! Thanks for linking up to Family Fun Friday!
ReplyDelete