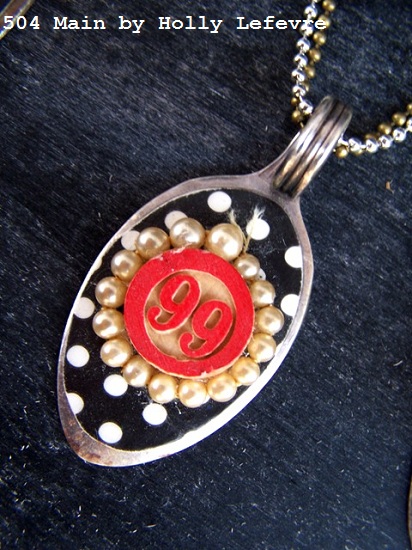
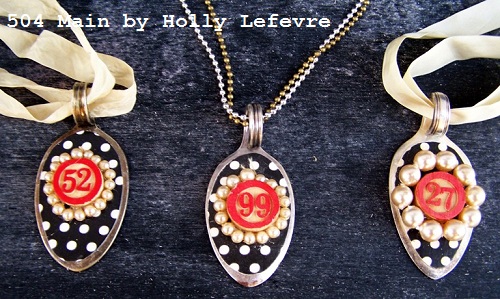
I love crazy funky jewelry...
and if that jewelry involves something odd -
something not jewelry like - all the better!
I started making some spoon jewelry about 8 months ago
and LOVE using the flattened spoons as a base for a pendant.
I used to make jewelry all the time...and really enjoyed it.
I am so excited to start doing it again!
I had not shared these beauties because...because I am so behind...
but this week I am participating in Spring Bling Week with some other fun bloggers...
so now is the perfect time to share.
Best yet, you can totally customize this jewelry to suit your style...
I have made some with keys, costume jewelry, fabric, buttons, and gorgeous paper!
Here is how to make your own
Bingo Marker Spoon Pendant!
Now, remember I am not a regular jewelry maker
- at least for a long time now...
so if you have any questions or need clarification, let me know!
SUPPLIES
- Old spoon - older is better - modern (stainless steel) is harder and much harder to flatten. I buy my spoons already flattened because I buy multiples. It is pretty easy to flatten your own spoons (I will be honest, I have a harder time getting a nice loop at the top). You can usually find old spoons at garage sales and thrift stores for about $1.00.
- Mod Podge. I use Matte.
- Decorative paper - I used Black and Ivory Mini Dot Reverse from Canvas Corp.
- "Trinkets" In this case bingo markers from Tim Holtz (available at Aaron Brothers or Michael's or other craft supply sources)
- String of pearls - I used some old costume jewelry (In the photos, you can see there are some bigger pearls and some smaller ones). You can pick up pearls (or beads) at the craft store or look at the thrift stores - they do not need to be in great shape - you will be cutting them apart.
- E-6000 Glue
- 1 1/2 yards of 1/4- 3/8" Ribbon
- Necklace closure (I used a Curved Lobster Clasp and Ring - it came in a package together). You can also use a toggle clasp or whatever type you prefer. I also show these on ball chain necklaces too.
- Paint brush (for Mod Podge)
- Toothpick
- Hammer or mallet
- Pliers(needle nose that can cut and ones with a good grip)
- Old rag/towel
MAKE IT!
A post I saw at Busily Spinning Momma inspired me to start using spoons (her tutorial for flattening the spoon is great!)
THE SPOON:
With a few hard whacks I have no trouble flattening the spoon - that is easy...getting a pretty loop at the top is not as easy and requires muscle (which I have...but still am not happy). I have to be honest, I do not always love the results I get when forming the loop at the top of the spoon - that is also why I choose to buy them. I just have to tell you this - because how much do you hate when a tutorial looks easy (any tutorial) and it is not as it appears!
FLATTEN THE SPOON:
- NOTE: Do not do this late at night - it is loud!
- Do this on a solid surface - (not on your granite counters!). I went outside to the cement on the driveway.
- I lie to lay a towel or rag down on the cement and place spoon, bowl side down, on the towel.
- Hold the handle of the spoon and hit the spoon hard with the hammer, over and over, moving all around the spoon, until it is flat.
MAKE THE LOOP:
- About 1 1/2 inches above where the spoon bowl ends (on the handle/stem). Use your needle nose pliers to cut the stem off ( grip it and then bend the stem back and forth a bit and it snaps off).
- Then switch to regular pliers (I find they have a better grip) to twist and loop the shortened stem into a loop. I like to use a large glue stick and hammer to begin my bend...but like I said - I can never get mine quite right (just being honest - see my note above).
- OR
- You can also just clip the stem off entirely and drill a hole in the top of the spoon
See My loop ends up bigger than desired or flatter
(depending on the day I am having!)
DECORATE IT!
(Be sure to work on a protected surface)
- Place the spoon face up on your decorative paper (which is also face up) and trace around the outside edge. (see photo sequence below)
- When you cut the shape out, you will want to cut inside about 1/8" from your traced line - You do not want the paper to go to the edge of the spoon.
- Liberally brush Mod Podge onto the flattened area.
- Press the decorative paper onto the spoon and smoother with fingers. You might have some Mod Podge "escape" - work on a protected surface and just wipe off the excessive.
- Wait 1 minute or so, smooth out again, and now apply 2-3 coats of Mod Podge on top of the paper, smoothing as necessary.
- Let dry completely.
GRAB YOUR TRINKETS
- Using the E-6000 glue the Bingo marker to the correct place on the spoon. If some "escapes" - that is OK - now we are going to place the pearls.
- Wrap the
pearls around the outside of the bingo marker to measure the length you
need - carefully cut - If you pearls will not stay together once you cut
the string, you can place them individually on the spoon. I usually use
old necklaces so mine stay together.
- Use a toothpick to apply some E-6000 around the edge of the Bingo Marker and slightly onto the spoon next to the marker and now wrap the pearls around it.
- Let dry overnight.
NECKLACE:
I have sold these with simple ball chain necklaces (see the pendant with #99)...BUT for this necklace I used 100% silk (dye able) ribbon and closures I purchased at the craft store.
- Cut a length of ribbon 52 inches.
- Thread one end through the circular part of the clasp, bring it back around to meet the other end.
- Your ribbon is now doubled.
- Slip the spoon onto the ribbon.
- Thread both ends through the hole on the Lobster clasp.
- Measure to make sure your necklace/ribbon is the desired length (for me this was 24") and pull through the ribbon to accommodate that length and tie off, tightly.
That's it - my Bingo Marker Spoon Pendants!
Get creative - keys, gems - almost anything looks great and it easy to apply to a flat spoon!
Be sure to visit the other fun bloggers and their creations
Holly from 504 Main
Kate from Cheap Crafty Mama
Kara from Happy Go Lucky
Rebecca from My Girlish Whims
Natalie from North Shore Days
Amy from One Artsy Mama
Do you make jewelry?
Do you have a favorite type of jewelry?


What a neat idea, Holly! You are so creative. megan
ReplyDeleteAbsolutely in love with this! What a brilliant idea.
ReplyDeleteBanging on my granite counter top is a bad idea??? ;)
ReplyDeleteI didn't have much luck anyway. I'll give your driveway method a try!
These are so cute, Holly.
Ok so I have to tell ya... I'm in love - with the spoons, the way you used ribbon, your honesty in not being perfect with the spoon bending & those bingo markers - ackkk!!
ReplyDeleteXo
Ok so I have to tell ya... I'm in love - with the spoons, the way you used ribbon, your honesty in not being perfect with the spoon bending & those bingo markers - ackkk!!
ReplyDeleteXo
Extremely creative idea Holly. I love it. You are on creative fire lately with all these great projects!
ReplyDeleteI love it!! Thanks for sharing your bling:)
ReplyDeleteI love this! And way to keep it real, I appreciate the note about the loop. I tried getting spoons at the dollar store... yeah, those do NOT flatten. I will have to be on the lookout for older ones!!
ReplyDeleteYou have a great idea there never would have thought of doing that with a spoon.
ReplyDeleteThose are so fun ... I love the bingo markers!
ReplyDelete