The last time I tried to do anything for St. Patrick's Day was about 6 years ago...and then I left the green food coloring in my purse, got on a plane and it exploded all over everything. I had green(er) money, green makeup, green hands. After that I steered clear of the greenness. Until this year. But now I feel like I have waited long enough to give St. Patrick's Day crafts and treats another shot!
This is so easy...really easy...and in expensive First let me say this (because I don't want to be one of "those bloggers.") I saw this on Facebook from Nanalulus Linens and Handkerchief's via Pretzels and Punch. In my research I have also seen this photo on tumblr and on Pinterest...but no one has ever seemed to give specific credit (as far as I looked).
These shamrock are very versatile.
Of course you can jazz one up with a vintage button, lace, or a jewel.
I decided to make mine a garland for the window I have on my porch
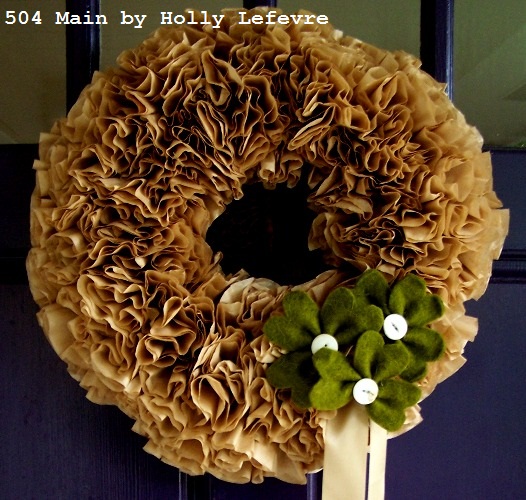
and a few larger ones for my coffee filter wreath on the front door.
SUPPLIES
- Green Felt: I made different versions. For the wreath decor, I used a better quality wool felt (about $4 per piece). I also just used the very inexpensive craft felt for the shamrock garland.
- Leaf pattern (download it here)
- Green Thread
- Needle
- Scissors
- Optional: glue, pipe cleaner (for stem)
- Optional: buttons, beads, gems, ribbon
- Optional: hot glue for attaching to ribbon, pins, barrettes, etc.
MAKE IT!
Download the pattern. Size it as you wish.
There are 2 ways to make these shamrock's.
They are basically the same, the second method
(the one I prefer because it gives a tighter shamrock)
just requires a few more stitches.
For BOTH USE THE TEMPLATE ABOVE.
EASY TO DO #1
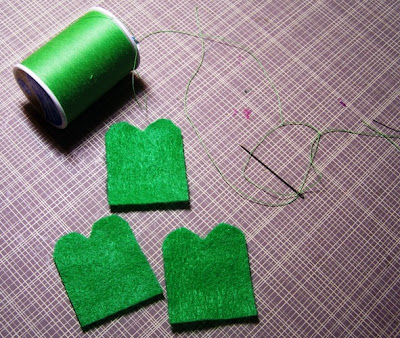
- Trace the pattern onto the felt and cut out the leaves - 3 per shamrock.
- Thread your needle and knot one end.
- Lay the three leaves flat and do a running stitch through all three leaves about 1/8 - 1/4 inch up from the bottom. Make sure the knot is "good" so that when you pull the thread it does not pull through.
- Pull the thread to "ruffle" the shamrock
- Pull the thread so that the bottom of the shamrock is tight. Then run the thread through the bottom of the shamrock to hold it together.
___________________________________________________________________________
EASY TO DO #2
- Print the template shown above.
- Trace the pattern onto the felt and cut out the leaves - 3 per shamrock.
- Thread your needle and knot one end.
- Fold the shamrock in half, and then fold each side down (basically making a pleat).
- Push your needle through the first leaf; then pleat the second leaf and push needle through it and move the second leaf right next to the first; repeat with the last leaf.
- This step is optional (I chose to do this because it seemed to keep my shamrocks tighter when sewing the other leaves on): Then sew it back through the leaf, and then back through again.
- Repeat with each leaf, push the subsequent leaves right up next to the other leaf.
- At the end of the third leaf, loop the thread back to the front leaf and sew the bottom of the shamrocks together (I looped it a few times).
OPTIONAL: If you want to add a stem, just slip it in now and it may need to be secured with a dab of glue.
OPTIONAL: Add a button, a ribbon, a gem to the center for some detail!
You can use these shamrocks for so many things.
Hair clips, decorative pins, garlands...
anything you can imagine!
GARLAND Using hot glue, I applied glue to the back of the shamrocks and attached them to a 1/4" string of ribbon about every 4". You can also do a simple stitch or attach the shamrocks to a ribbon (it will be visible though).
DECOR ACCESSORY
I also just made a few larger shamrocks to tuck into my coffee filter wreath to dress it up for the day. I just finished off the shamrock with a pretty vintage button and then used hot glue to attach a skewer (divided in half) to the back of the shamrock to create a "pick" of sort.
BROOCH/PIN/CLIP
To make it a brooch/pin, use a simple pin backing from the craft store and glue it down to the back. Here is a quick shot I took of my girlie with her clip in!
Be sure to check out my other St. Patrick's Day ideas!
&
Do you decorate for St. Patrick's Day?


Awesome!! Easy and pretty...I love this, wish I've seen it before! Copied it for next year. Thank you and have a happy St. Pat's Day.
ReplyDeleteFABBY
Holly, what great ideas for making these wonderful shamrocks. They are all wonderful and how very creative and smart you are in making that fabulous shamrock poundcake! Thanks for sharing all the green with us, it is wonderful.
ReplyDeleteThese are Sweet! Thank You for sharing!
ReplyDeleteLove this shamrock tutorial!
ReplyDeleteJust bought the pin backs....so making these!!!
ReplyDeleteLove these Holly..one of my favorite St. Patty's projects!
ReplyDeleteSo cute, Holly! Must make these to pinch-proof my girls!
ReplyDeleteWOW...your green food coloring story is crazy! I wouldn't go near green for a while either. :) Your shamrocks are adorable and I love your wreath!
ReplyDeleteCute Holly... great shamrock technique!
ReplyDeleteSo glad you are making green things again :)
ReplyDeleteThese felt shamrocks are cute!
I'm glad you overcame the green 'cause you're rocking St. Patrick's Day this year! :) Love the way the shamrocks look on your wreath!
ReplyDeleteThis is so cute! I actually made a garland of these for my daughter's birthday party this last week, and I love how fun and easy they are to put together! I love how pretty they look on your wreath!
ReplyDeleteWhat a great tutorial, Holly! Your photos are great and it makes this really look easy and fun. Thanks very much for sharing!
ReplyDelete