I am banner obsessed!
I have been making and selling banners locally
and love always making them different.
Take note this is the first ever St.
Patrick's Day craft I EVER posted.
(I am kind of proud of myself)
We do make leprechaun house out ot tissue boxes every year...
but that doesn't count!
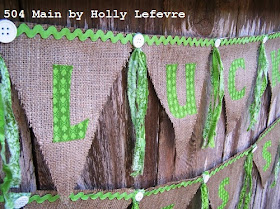
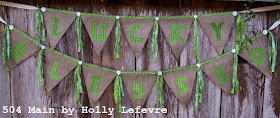
These banners - "Lucky" and "Blessed" were actually a custom order.
This lady has the sweetest cottage
and she hangs my banners in her windows!
(I may sneak over and snap a photo later)
(I will ask first!)
SUPPLIES -
This can be a "sew" or a "no sew" project!
This can be a "sew" or a "no sew" project!
- Fabric for the banner. I used burlap for these banners. I do use drop cloth a lot (but I usually sew them). You really need less than 1/4 of a yard (see diagram right below.)
- If you want to see how I make Drop Cloth Banners, my LOVE Banner tutorial shows you how.
- Fabric for the letters: I buy Fat Quarters and use about 1/4 of that
- Thermoweb 17-Inch by 5-Yard Heat'n Bond Ultra Hold Iron-On Adhesive
- I only use a small portion of this and at some craft stores you can buy smaller amounts or use a coupon! I use this because it bonds so well to the fabric and then in turn I encounter no fraying on the edges of my letters. NOTE: You could use Mod Podge or glue for a different effect.
- Ribbon, your choice, 2.5-3 yards, I prefer 7/8 or 5/8 inch grossgrain ribbon.
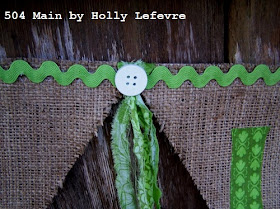
- Buttons, trim, spools - depending on how you want to accent your banner. For this I used ripped fabric strips and big white buttons.
- Letters - I use chipboard letters from the craft store.
- Sewing machine (or hot glue gun or fabric adhesive). I prefer to sew my triangles onto the ribbon...but you can use buy pre-made triangles from Canvas Corp.
- Scissors
- Iron and ironing board/surface
- Mod Podge
- Paint Brush (for Mod Podge)
- Cut 5 triangles for "Lucky" or 7 for "Blessed," 9" wide and 10" long. See above diagram from measurements.
- I like to use Mod Podge and "paint" around my triangle edges to keep the burlap from fraying. I technically paint the back side of the triangle. It does stiffen the burlap a bit...but not that much and keep the banners looking nice.
- Follow the package directions and adhere the Heat N Bond to the back side of the fabric.
- Trace the letters on the back of the fabric (essentially you are tracing them on the Heat N' Bond backing). Be SURE to flip the letters (mirror image) when tracing on the back, so that when you cut them the letter are going the right way. Cut the letters out. For PHOTOS on how to do this, refer to the LOVE banner
- Carefully peel the back off of the Heat N Bond, and then position each letter on the triangle. Once happy with the placement, press into place with an iron.
- Sew (or use hot glue or fabric glue) the triangles onto a ribbon. Leave about 24" on each side of the first and last letter for hanging.
- OPTIONAL - EMBELLISH:
- Hot glue ric-rac along the top edge
- I tear fabric ribbons and hang them/tie them between the letters (you can read more about that on my birdhouse banner tutorial)
- Finish off by hot gluing buttons. I like just the fabric but this was a custom order and she wanted the buttons.
I of course made a Lucky banner for my house too!
Getting ready for Spring?
Check out my Birdhouse Banner!


These are super cute! She us going to love them! I tried my hand at making a banner for our show booth. It turned out looking cute but i wouldn't sell it. Lol. I'm no eamstress and the stitching was uneven at best. :) Thank you for sharing this tutorial. I'd like to try my hand now at the no-sew version. Sounds much more user friendly for a gal like me!
ReplyDeleteThese are so sweet Holly!! I love the burlap and those little rag ties are super cute!
ReplyDeleteThis is so cute, Holly! I need to make one for the patio.
ReplyDeleteLooks great Holly! So festive! Though I will pretty much love anything in burlap! haha
ReplyDeleteSo cute!! And that birdhouse one is AWESOME!!
ReplyDeleteOh my gosh! I love those! You should sell them on your blog. I would buy one--for real.
ReplyDeleteThose are so cute...especially hung together like that!
ReplyDeleteSO cute, Holly! I can't believe this is your 1st St. Paddy's Day decor post- you rocked it! Soooo cute and we are also on the banner bandwagon---- LOVE them!! Happy St. Paddy's Day to you! (: xoxo
ReplyDeleteSo cute, Holly! I love the burlap background!
ReplyDelete