A little bit ago, a lovely little package with a couple yards
of Waverly Fabric from Jo-Ann Fabric and Craft Store arrived on my doorstep.
This fabric sent me over the moon - gorgeous and fun and fabulous!
I had one million and one ideas for it...
and was only given one rule...Waverize It!
Waverly is celebrating its 90th Anniversary!
For over 90 years Waverly has been a premier name in home fashion and lifestyle fabrics. They continue to innovate and produce high quality, stylish goods with an extensive selection of amazing designs to suit your needs.
And, guess what?
Waverly and Jo-Ann want to see your ideas too!
They are hosting a Waverize It! Facebook Contest
where you can win great prizes for showing off your creations!
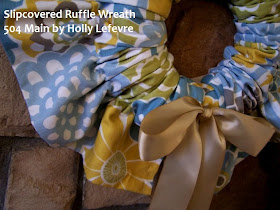
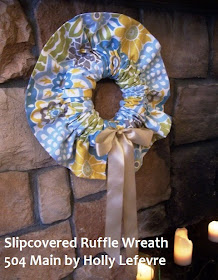
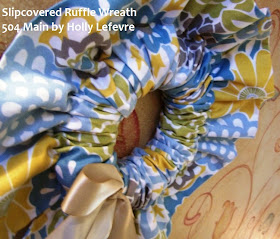
I was excited to show my friends the FABULOUS fabric I received...they all loved it. I had requests for curtain, slipcovers, blankets, totes bags...but alas I only had a couple yards. I went back an forth...for a long time...as to what I was going to create for my home with Waverly's Button Blooms Fabric. Finally, a few of my ideas morphed into one and I created this Slipcovered Ruffled Wreath.
I love wreaths and I like to change them out...but my wreath collection is taking up quite a bit of space. I need something flexible...something changeable....and this is what I came up with - a wreath with a wardrobe!
SUPPLIES
1/2 yard Waverly Button Blooms Spa fabric from Jo-Ann
8" straw wreath
Packing Tape or Duct Tape
1/2" Velcro (optional), cut to 1"
1- 1/1/2 yards ribbon (I used 1" cotton grossgrain)
White thread (and bobbin)
Sewing Machine
Old (but sharp knife)
Fabric Scissors
Ruler or L-Square
Tape measure
Iron
MAKE IT!
- Measure the outside circumference of the wreath, by walking your tape measure along the outside of the wreath form (mine equaled about 27" )
- Measure the width/circumference of the wreath - wrap your tape measure around the form (does that makes sense?) Mine measured about 5 1/2".
Prepare the Wreath: (you need wreath, knife, packing tape, Velcro)
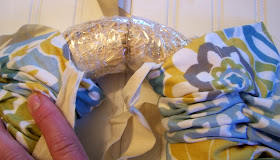
- Make one cut through the wreath (the straw can get messy - protect your surface with a newspaper or the like)
- Finish off/clean up the cut ends by wrapping packing tape over the exposed ends of the straw.
- Place a strip of Velcro on each side of the opening.
Prepare the Slipcover (you need: fabric, ruler, sewing machine/thread, iron, ribbon)
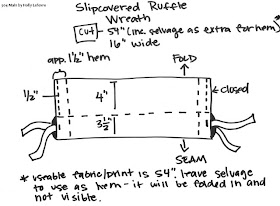 |
| Click HERE for a full size printable |
- Cut a strip of fabric: 16" wide by the length of the fabric 54" (I left the selvage on when I cut, so my total length was actually longer, but the usable area is 54")
- Fold the fabric in half (right sides facing each other). On the wrong side of the fabric using a 1/2" seam allowance, sew a single straight line (at the cut edges).
- Turn the fabric, so right side is facing out
- Press the seam and the fabric into its folded position.
- Turn the selvages inward to create a "hem" - press the hem.
- Sew a 1 1/2" hem all around the openings at both ends of the fabric/slipcover.
- Press.
- 3 1/2" up from the seamed edge, sew a straight stitch the length of the fabric.
- (Optional) Top stitch 1/2" on the longer section of the fabric (4" Ruffle/the side with the fold) to the single stitch you just created across the fabric. This keeps the ruffle portion of the wreath closed.
- Tack lengths of ribbon (approximately 18" long each) on either side of the openings - Be sure to tack the ribbons on the portion between the seamed edge and the line you just sewed.
- Press if necessary.
- Now, feed the wreath through this opening, pulling one side of the fabric all the way around to the opposite opening of the wreath.
- Distribute gathers evenly, and then at the opening tie the ribbons on either side to hold the slipcover in place. You can tie in a bow and use that as decoration, but I prefer to tuck the ribbons inside the slip cover.
Now you have a slipcovered wreath!
All you need is one wreath form and you can create a
whole wardrobe of coverings covers whenever you want!
Of course embellishment is great too!
I used a simple satin ribbon...but vintage brooches, buttons, oversize pom poms -
you name it - can all look great with the right fabric/color combinations!
Be sure to enter the Waverize It! Facebook Contest!






Holly this is so cute what a clever idea
ReplyDeleteThis is so pretty Holly! I love the fabric, that print is adorable!
ReplyDeleteSo cute! You know my mom used to make wreaths like this, and she would save plastic grocery sacks, and stuff it in there instead of an actual wreath. So funny I can actually visiualize her making those still.
ReplyDeleteSo cute! You know my mom used to make wreaths like this, and she would save plastic grocery sacks, and stuff it in there instead of an actual wreath. So funny I can actually visiualize her making those still.
ReplyDeleteMy wreath collection is ridiculous too! I even made a wreath for my little girl's Sofia the First Birthday Party! {I'd love for you to hop over and check it out}
ReplyDeleteBut I just might have to add this one to my stash. It is super cute and different!
Thanks for the inspiration!
What a great idea! Now you can swap wreaths quickly and easily and don't have to worry about storage space.
ReplyDelete