Can you really ever have enough candles?
No and no and no!
I know that I do start to tire of the same old candles after awhile.
(that might just be my personality!)
So...what's the trick to keeping the look "fresh"?
Changing up vignettes, adding seasonal touches,
and creating interesting embellishments are the key.
I know that I do start to tire of the same old candles after awhile.
(that might just be my personality!)
So...what's the trick to keeping the look "fresh"?
Changing up vignettes, adding seasonal touches,
and creating interesting embellishments are the key.
Way back in the wedding planning days, I used these plain candles (that you can purchase at just about any grocery store or mass retailer) ALL THE TIME. I decorated them in a bajillion different ways because these beauties are chameleons - they can be transformed into whatever you want them to be...and as a PLUS, they are totally cost effective.
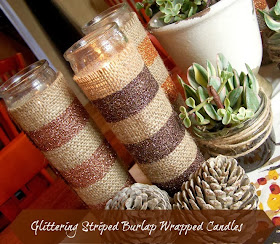
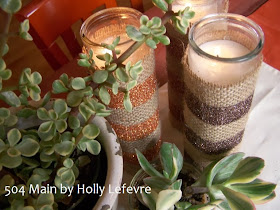
Vellum, ribbons, paint, decoupage, etc., are all great, but today I am showing your how I created glittering striped burlap wrapped candles.
I have them on display with the mantel I created at the local coffee shop...
and everyone loves them...especially me!
I have them on display with the mantel I created at the local coffee shop...
and everyone loves them...especially me!
(this is the update to make the mantel less Halloweeny).
Of course when you burn candles...
trim the wick to 1/4"
never leave them burning unattended
keep them away from children
and be cautious of where you place them.
Please always use caution
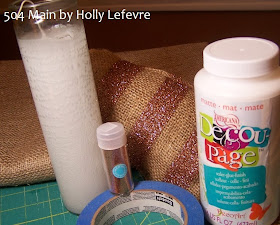
Supplies
- Candles (from grocery or mass retailers, prices range from $1.25 to $1.60)
- Fashion/interior weight burlap
- Decoupage (DecoArt)
- 1" sponge brush
- ScotchBlue Painters Tape, 1"
- *GLITTER! I used Martha Stewart Crafts glitter in: Fire, Sunstone, and Brownstone
- Hot Glue/Glue sticks (or more Decoupage)
- Wax paper/newspaper)
*NOTE: This uses a lot of glitter. In the smaller vials of glitter I was able to make three candles, but used every last sprinkle of glitter.
DIY IT!
Cut squares of burlap 7" x 8" (this accounts for a 1" overlap as you wrap the burlap around the candle)
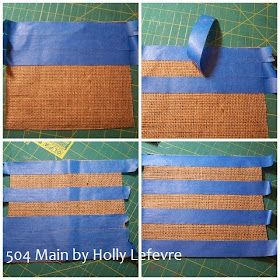
I use my ScotchBlue to create my stripes:
- (going horizontally across the 8" width) Line up one strip of tape along the top, then another right below, and another right below (3 rows)
- Then remove the middle piece of tape and place it below the third row (You have 4 rows now)
- Add another piece of tape below that tape (you have five rows)
- Remove the tape from row four and place it after row 5 (you have 6 rows)
- See what I am doing????? (see collage below)
- Place one last piece of tape below row 6 (you finish with 7 rows - with "empty" rows between - I am counting the empty rows as rows)
I used small squares of wax paper for each wrap. It is much less messy to use than newspaper and the candle wraps peel right off after they are dry.
Place each taped piece of burlap on top of a piece of was paper (or other protective coating)
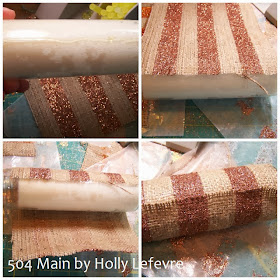
Use your foam brush and brush a layer of Decoupage on the empty rows. (see collage below)
NOTE: try to get overlap the ScotchBlue so that you get a clean line, but try to get as little Decoupage on the tape as possible (it keeps you from sticking all kind of glitter to tape that will be trashed).
Grab your glitter and generously sprinkle all over the stripes.
Tap your excess glitter off into a coffee filter or piece of paper/towel to save.
Let dry completely. When dry, remove from wax paper.
Gently peel ScotchBlue tape off.
You may get some fraying...be careful! The fraying adds character but you do not want to unravel the whole creation.
- Heat up the glue gun...
- If you want your wraps to be on the candle permanently, brush on some Decoupage all over (the candle) to adhere your wrap. I wanted to be able to remove mine...and have found that I can peel off the hot glue.
- Hot glue will come in handy to close that back "seam" after you wrap the candle. If you choose not to use hot glue, add some Decoupage to the overlap and use rubber band to hold it in place while it dries.
- Now, back to the hot glue...
- Run a line of hot glue down the candle, match up the bottoms or the wrap and candle...and wrap/roll.
- When you get all the way around to the other side, run another generous line of hot glue along burlap that is on the bottom, continue rolling your wrap over to cover the hot glue and let dry.
That's it all done. Now you have a super chic and elegant glittering burlap candle wrap!
What have you done with glitter lately???




These are so elegant and pretty! Love them! ;-)
ReplyDeleteThanks you!
DeleteI love this Holly! I have all the materials with the exception of the candles so this would be a thrifty craft for me to copy from you :-) I could see all kinds of designs to do for different tablescapes and decor! Pinning!
ReplyDeleteThis is a cute way to create candles that look different from any you could buy, and if you know me, you know I like a bit of glitter or sparkle.
ReplyDeleteHolly! I love these..you had me at glitter! ;-)
ReplyDeleteHappy Thanksgiving!!
xoxo
Denyse