I love to throw a PARTY!
No seriously, I would probably have a party every night, for any reason...if I could! After many years of planing parties and wedding for other people, I delight in entertaining my friends. I love to create intimate environments full of unique touches. I like my every day occasions to be special but not overdone, and this idea for centerpieces is a perfect example of something that is so easy to put together but has great impact. I used if for Christmas (even thought we might have eaten dinner in our jammies!) and will be using it for New Years and through the winter...and well, knowing me even into the Spring!
For quite awhile I have been a part of the Lifestyle Crafts team, and as they have recently become part of We R Memory Keepers, I will continue to be on the Lifestyle Crafts Studio PARTY Team...so I will be creating fun and amazing party decor every month using the L Letterpress and the Evolution Die Cutter/Embosser and more!!
I cannot wait to share some of my ideas with you!
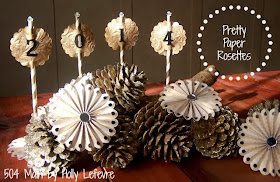
The base of my centerpiece is made from a branch (FREE) with some glittered pine cones. I bleached and glittered the pine cones. BUT you can use these rosettes tucked into a plant or vase...and the number stands can go anywhere and have any words on them!
Supplies for Rosettes
- Evolution Die Cutter and Genius Platforms
- Rosette die
- Sticky Thumb Adhesive
- 2 sheets 2 x 12 decorative paper
- 1/2" craft mirror
- Hot Glue
- Paper Straws or skewers
The beauty of the Genius Platform is that is is magnetic! So awesome! Your dies won't slip slide around.
- Place the rosette die toward the side of the platform.
- Place 1/2 sheet of the paper on top and cover with Mat A.
- Place the stacked set of platforms/mats into the Evolution and turn the handle to move the platform through the machine and cut your die.
- Repeat 6-8 times to get all you rosettes.
- Use the perforated lines to accordion fold the rosette. Here is a shot of the "phases."
- Use the Sticky Thumb Adhesive to apply adhesive to each ends of the rosettes. Bring the end together and adhere to one another. The rosette will look like an accordion folded circle.
- Place good amount of hot glue on the rosette, while holding it down with the other hand.
- QUICKLY (I suggest practicing the pressing down of the rosette a couple times) press the rosette down with your fingers and place the mirror (glue side down) in the center of the rosette.
- Hold until glue dries.
- Flip over, add some more hot glue to the center hole and insert your paper straw or skewer into the hole; hold until glue dries/hardens.
Now, simply add the rosettes to the pine cone decor by poking your straw/skewer into the "holes" or into the vase or soil...or with just about anything you can imagine. I just love the rosette and you will too!
To Make the Name/Year Decor:
4 - Party Flag Insert Die
4 - Rosettes (and paper) - see above for how-to
1 sheet complimentary paper
4 - Paper straws or dowels
Letters/Numbers in stickers or cut out for wording
4 - Pearls or gems for (post) topper
- With the Evolution, cut 4 Party Flag Inserts in your preferred shape (I LOVE these guys - I use them all the time for everything). This set comes with great shapes and the slits for the straw/skewer/post is already cut when you run it through the Evolution...just slip in your straw or dowel...DONE! So easy!
- Now, with the Evolution, cut 4 rosettes, and cut 4 1" x 1" squares of paper (you can use larger chipboard discs or buttons too).
- Prepare the rosette as above, but this time, add some hot glue to the 1 x 1 square and press the rosette down onto it (this holds the rosette flat an in place).
- Add hot glue to the center hole and place the paper straw into the hole.
To finish off the Party Flags:
- Add your precut (or stickers) numbers/letters to each shape.
- I used "2014" in black. I happened to use a heavily textured paper, but if you use a flat cardstock, you can also use a metallic sharpie to write the numbers or words you desire.
- Insert the Party Flag onto the straw.
- Then add a pearl or bead at the top of the straw using hot glue.
Look how pretty these rosettes and personalized accessories look
for your New Years Party or ANY party!
Both of these dies are so versatile...you will love them!
By using promo code 504MAIN you can save 20% on We R Memory Keepers Products at shopwer.com
.
For more amazing ideas and product keep up to date with
We R Memory Keepers on facebook and twitter


You are so smart, Holly. This is a gorgeous centerpiece and it certainly will look great throughout the winter, for sure! Happy New Year!!!
ReplyDeleteYour rosettes are cute and now you've got me thinking about how these could be incorporated into my wedding décor for the reception. Thanks for the inspiration.
ReplyDeleteThis is so pretty, Holly! I love the little bead detail on the top of each straw!
ReplyDelete