Yesterday I shared a Monogrammed Burlap Canvas project
that is part of the Michaels and Hometalk Pinterest Party.
And, well,once I start thinking about a project I just cannot stop myself.
I just fell in love with these small burlap canvases and the laser cut wood doilies...
and I had to make another personalized project.
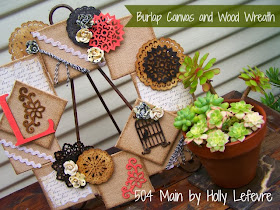
That is where this wreath came in!
In the past I have made burlap canvas wreaths using old family photos and absolutely love the look, so this is a perfect addition to my home.
On Sunday, February 16 join some Fabulous Hometalk Bloggers all over the U.S. and even parts of Canada to craft some Pinterest Inspired projects!
I will be at the Marina, CA store demonstrating and helping...
and I am sure being inspired by you all as well.
(see the bottom of this post for a few details or yesterdays
Michaels/Hometalk Pinterest Party post for complete details)
Visit Hometalk using the hashtag #mpinterestparty to see a ton of great projects!
Visit Hometalk using the hashtag #mpinterestparty to see a ton of great projects!
SUPPLIES
(I
have included some pricing. Prices are subject to change and be sure to
bring your COUPONS - there are links at the end of the post!)
- 10 - 4"x4" Burlap Canvas (Artist's Loft). Sold in 3-packs ($2.99/3 pack)
- 12" Floral and Craft Ring, ($2.29)
- 1 small wood Letter (L) (.99)
- 1 birdcage wood laser cut (.99)
- 2 floral scrolls (.49-.99 each)
- 1 12 x 12 piece scrapbook paper (.20 each+)
- Decoupage medium
- Foam brush
- 3 "Large" laser cut wood doilies ($1.19 each)
- 4 "small" laser cut wood doilies (.49 to .99 each)
- Paint/Color (2 options):
- 1 Tim Holtz Distress Paint, Fired Brick ($4.99 each)
- Tim Holtz Distress Ink, Frayed Burlap and Black ($4.99 each)
- OR
- Craft paint and brushes in desired colors
- Scissors
- Glue, Weldbond ($2.99)
- Buttons or other decorative accessories (varies)
- Paper roses ($2.00 per sheet)
- Ric Rack ($1.99 per package)
- Bakers Twine or desired trim
MAKE IT!
- Use a ruler or L-Square to establish guidelines. I lined the craft ring up so that I would have center lines horizontally and vertically. It helps keep the burlap squares in line.
- Lay the burlap squares out. Begin with 12 o'clock, 3 o'clock, 6 o'clock, and 9 o'clock - being sure to keep them lined up; Fill in between these spaces with more small canvases.
- Add 2 additional canvases on top - one on the diagonal near the top left and one on the diagonal near the bottom right.
- Now start to determine what accessories you want to put where, where you want to add color, and how you envision the final project.
- NOTE: I highly recommend sketching or snapping a quick photo once you get the layout you want.
- Pick 3 squares and add some paper to them for depth and detail. First cut the paper to an approximate size square and then for interest, tear the edges. Apply decoupage to the back of the paper, and position on the burlap canvases; press down and let dry.
- Before you begin gluing down the other details or gluing the canvases to the base, ink the edges with the Distress Ink. Just run the ink pad around the edges and especially on the corners.
- Color/Paint/Ink your wood doilies, birdcage and monogram. Select your desired color and cover completely. Let dry. I used Distress Paint on the L one small doily; Frayed Burlap Distress Ink on one large and 2 small doilies; Black Distress Ink on 1 large and one small doily.
- Begin glue the canvases to the wood base. Start at the top and work around clockwise, one at a time - this will help you keep the canvases in position. Add the top two canvases. Let dry...but if you are careful you can continue to glue down the details.
- Let the wreath dry.
- Add trim like rick rack, bakers twine, buttons, and whatever you love to finish the wreath off.
If you are looking for a
monogram project but want something with less supplies and takes less
time...go take a peek at yesterdays post Monogrammed Burlap Canvas!
Hope to see you on Sunday!
When you visit Michaels be sure to look for the endcap displays showcasing Pinterest Projects that you can do NOW! Chalkboard crafts, gorgeous glass bottles, burlap, birdcages, sweet muslin bags - there is a craft for everyone.
When you visit Michaels be sure to look for the endcap displays showcasing Pinterest Projects that you can do NOW! Chalkboard crafts, gorgeous glass bottles, burlap, birdcages, sweet muslin bags - there is a craft for everyone.
Be sure to visit Michaels to see which blogger will be in your area...
and guess what...I will be at Michaels in Marina, CA from 1-4pm on February 16.
So what do you need to do to join in the crafty creativity...it's simple!
Check out ALL OF THE DETAILS in yesterday post!
Be sure to take advantage of Michaels coupons (U.S.Coupons or Canadian coupons) and
sales for your projects.


Really, really cute!! with lots of possibilities to create. Lynda
ReplyDeleteOh my gosh! So awesome! I want to make one. :)
ReplyDeleteOh my gosh is right... this is amazing!
ReplyDeletethis is so creative! Enjoyed getting to know you + your blog from the Pinterest Party!
ReplyDelete