Supplies
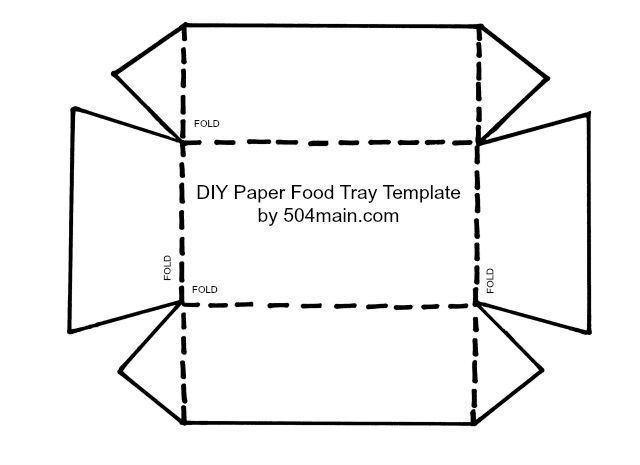
I like to make my paper food trays about 2" tall with a 3 inch bottom, just as the template is. You can make them in smaller sizes, just go ahead and adjust it on your computer.
- 8.5x 11 card stock (or 12 x 12, but there will be a good chunk leftover - but not enough to get 2 on one sheet, unless you resize them.)
- Good paper choices are plain card stock or printed card stock.
- Bad choices: velvet, flocked, glitter.
- Glue: hot glue, glue sticks or even double stick tape. I used hot glue. It dried the quickest with the best hold.
- Scissors or X-Acto knife (and cutting mat)
- Template: with dotted lines or without dotted lines
- NOTE: You can print directly on to the card stock (if your printer can handle it) by using the template without the dotted lines. If not, print out one and make a template using card stock or lightweight cardboard (I use cereal boxes).
- Optional: food safe serving paper (found at Michaels) or Parchment/wax paper cut into rectangles.
Make It
- Print out the template (dotted lines) or (no lines)
- (Let me know if you have issues printing, I am still new to this printable/template stuff1)
- Cut the shapes out in the desired paper.
- Fold along dotted lines.
- Place a small amount of glue on the flaps and quickly adhere them to the ends of the paper tray. Repeat on all four flaps
Oh wait - that's it...you are D-O-N-E!
Totally easy and plenty of time to whip some up before your Labor Day BBQ!
NOTE: Depending on my card stock selection, I may not use food-safe serving papers (this does not mean I have food-safe card stock). But cute serving papers make a fun addition and keep the food off of the card stock. It can also be beneficial if you are serving more oily snacks, like potato chips.
All that is left to do now is get ready for the party and fill those paper trays with chips, pretzels, candy, fruit, cookies or smores (like I did for my smores bar)
What are your plan for the holiday weekend?


No comments:
Post a Comment
Thanks for stopping by and joining the conversation! I sure hope you come back for more!