Wednesday, January 27, 2016
Monday, January 25, 2016
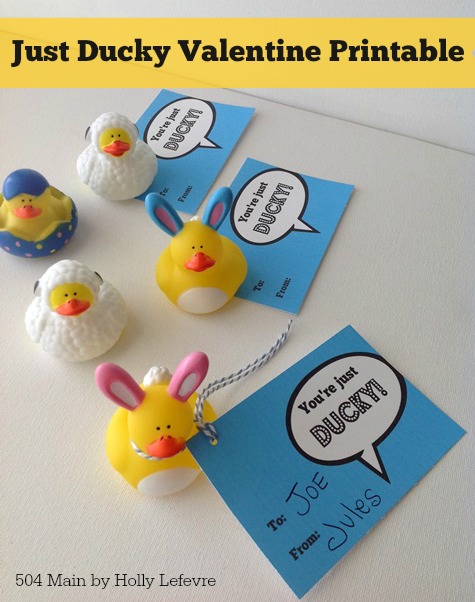
Do you remember those adorable Just Ducky Valentines from last year...well, guess what? The rubber duck OBSESSION continues!And it doesn't hurt that these ducky valentines were a big HIT last year. This year, my daughter wants to do them again (There is only one kiddo in her class from last year, so it is practically a new idea for everyone else). However, this year, I designed some CUTIE-PATOOTIE printable tags to go with them!
Thursday, January 7, 2016
We don't have snow here, even though my daughter wishes for it every night (chances are good it is not going to happen). It is cold but not that cold, but I thought with a few polar bear and Arctic inspired crafts we could create our own winter wonderland and appease her need for cold and snow.
My daughter has been super excited to go see the movie Norm of the North. Of course polar bears and all those adorable arctic creatures have something to do with it. I created -with close supervision and approval from my daughter - this CUTE tote bag inspired by Norm and I also entered it on the #NormOfTheNorthSweeps (Instagram Sweeps).
Supplies
Make It
Look at that cute face!
We loved the tote bag so much we made a sweatshirt too!It is exactly the same process, you just put it on a sweatshirt!
Who can resist a polar bear???? There are a ton of fantastic polar bear and Arctic inspired crafts on on the Norm of the North Pinterest Board.
Want a chance to win a $500 gift card or one of 5 Norm of the North Swag Bags in the #NormoftheNorthSweeps...visit the rules and upload your creation to Instagram

This post is written and created at 504 Main by Holly Lefevre
disclosure: I was asked to participate in the #NormoftheNorth Instagram Sweeps by Megan Media. This craft was created by me for that contest. No blog post was required.
My daughter has been super excited to go see the movie Norm of the North. Of course polar bears and all those adorable arctic creatures have something to do with it. I created -with close supervision and approval from my daughter - this CUTE tote bag inspired by Norm and I also entered it on the #NormOfTheNorthSweeps (Instagram Sweeps).
Supplies
- Polar Bear template (download it Bear 1 and Bear 2!)
- Blank white (or colored) tote bag. These are available at local craft stores and mass retail merchandisers.
- IMPROVISE:
- Buy a colored tote instead of what to skip the dyeing.
- This is also adorable on a sweatshirt! See photo below
- Fabric Dye. I chose to dye my bags and used a Turquoise dye - it seemed arctic and icy!
- 2 black 5/8" buttons
- White Sherpa fabric (I bought this at Michaels in the sewing area)
- White felt
- Black felt
- IMPROVISE:
- To cut costs or accumulating more supplies, white felt can be used in lieu of white sherpa fabric
- Heat N Bond Ultra (Iron, ironing board, clean white cloth/towel for pressing).
- You can try fabric glue, but I really LOVE this stuff Hot glue gun or fabric glue (for eyes)
- Scissors
Make It
- Dye your tote bag according to package directions (followed by washing an drying)
- OR
- If you are not dyeing the tote, wash and dry it before proceeding.
- READ and USE package directions for applying Heat N Bond.
- Apply heat and bond to the white sherpa fabric (make sure the face fits on the piece of fabric), the white felt, and black felt.
- Once the Heat N Bond is applied, flip the fabric over. You will trace your templates onto the backing of the Heat N Bond.
- Cut 1 face in sherpa
- Cut 1 snout in felt
- Cut 2 ears and one nose in black.
- NOTE: The sherpa will shed a bit around the cut edges.
- Remove the backing from the nose and iron it onto the snout. Use a blank/clean cloth for pressing. Trim if necessary.
- Remove the backing from the snout and iron it onto the face. Use a blank/clean cloth for pressing.
- Remove the backing from the ears and iron it onto the ears on the face. Use a blank/clean cloth for pressing.
- Remove the backing from the polar bear face.
- Place the (almost) completed face onto the tote bag, into position. Using the clean cloth, press the face onto the tote bag. (see photo above for approximate placement)
- Use hot glue to apply the buttons/eyes onto the polar bear.
Look at that cute face!
We loved the tote bag so much we made a sweatshirt too!It is exactly the same process, you just put it on a sweatshirt!
Who can resist a polar bear???? There are a ton of fantastic polar bear and Arctic inspired crafts on on the Norm of the North Pinterest Board.
Want a chance to win a $500 gift card or one of 5 Norm of the North Swag Bags in the #NormoftheNorthSweeps...visit the rules and upload your creation to Instagram
Subscribe to:
Posts (Atom)


